Go Chat App Tutorial: Build a Real-time Chat
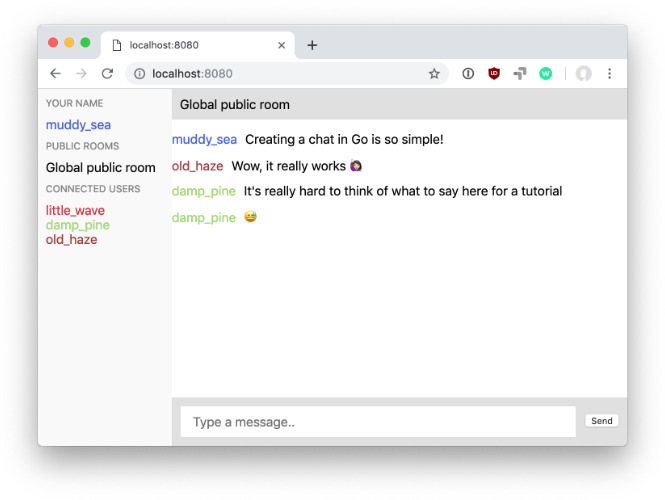
In this tutorial we'll be building a chat app using Go, JavaScript and Scaledrone realtime messaging platform. You can find the full source from GitHub.
Structure of the project
Our tutorial will be broken into two sections:
- Go authentication server which is responsible for giving precise access rights for each user and allowing them to connect to Scaledrone.
- JavaScript chat app that authenticates itself using the Go server and manages user communication.

Creating the Go authentication server
You can find the full main.go file from GitHub.
Let's start by defining a few constants and starting an http server for serving static files and providing a single endpoint for user authentication: POST http://localhost:8080/auth.
Replace the scaledroneID and scaledroneSecret constants with the ID and secret from the Scaledrone dashboard.
package main

import (
	"fmt"
	"math/rand"
	"net/http"
	"strconv"
	"time"

	jwt "github.com/dgrijalva/jwt-go"
	"github.com/gorilla/mux"
)

const (
	scaledroneID     = "YOUR_SCALEDRONE_ID"     // 👈 PS! Replace this with your own channel ID 🚨
	scaledroneSecret = "YOUR_SCALEDRONE_SECRET" // 👈 PS! Replace this with your own channel secret 🚨
	port             = ":8080"
)

func main() {
	r := mux.NewRouter()
	r.HandleFunc("/auth", auth).Methods("POST")
	r.PathPrefix("/").Handler(http.FileServer(http.Dir("./static"))).Methods("GET")
	fmt.Printf("Server is running on localhost%s", port)
	panic(http.ListenAndServe(port, r))
}
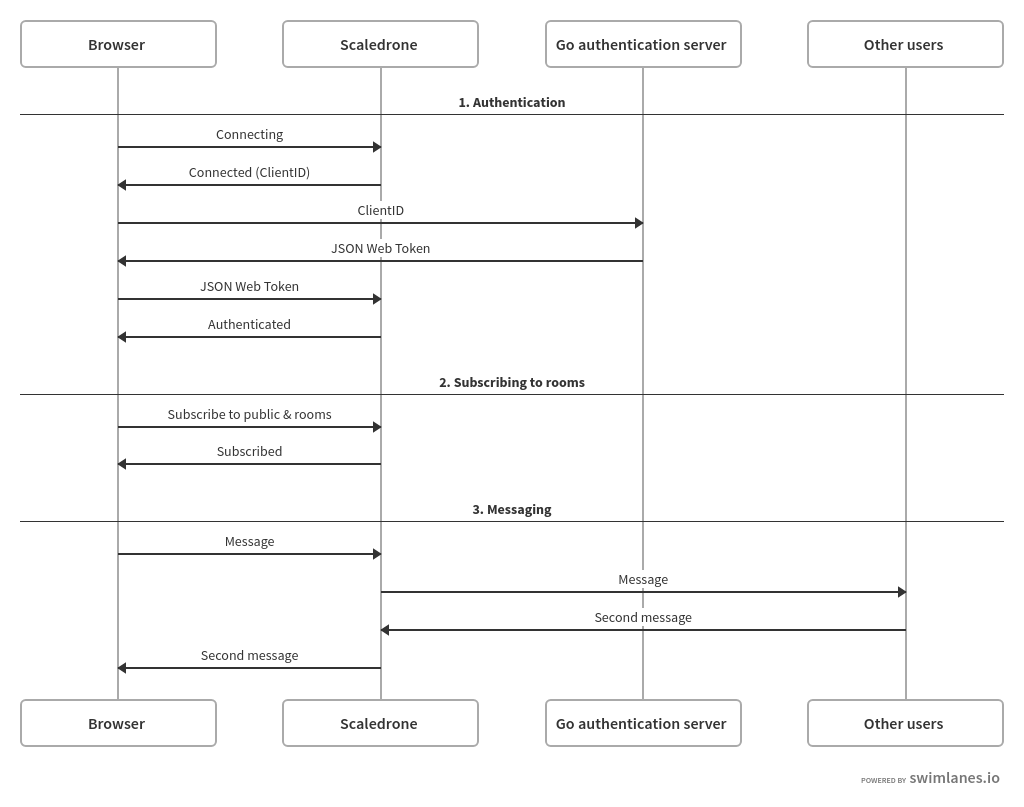
Every user connecting to the chatroom will authenticate themselves with a JSON Web Token generated by the Go server that the user then passes on to Scaledrone. This gives us the ability to define precise access levels for each user.
In addition to the standard exp claim (expiration time of the token), Scaledrone uses a few custom claims like
clientthe client ID of the connecting userchannelthe channel ID that your app usesdataadditional server-side data you can bind to a user. This data will be readable by all users.permissionsa regular expressions map of access rights. Each regexp string will target specific rooms.
You can read more about Scaledrone's JSON Web Token authentication here.
type customClaims struct {
	jwt.StandardClaims
	Client      string                      `json:"client"`
	Channel     string                      `json:"channel"`
	Data        userData                    `json:"data"`
	Permissions map[string]permissionClaims `json:"permissions"`
}

type permissionClaims struct {
	Publish   bool `json:"publish"`
	Subscribe bool `json:"subscribe"`
}

type userData struct {
	Color string `json:"color"`
	Name  string `json:"name"`
}

func auth(w http.ResponseWriter, r *http.Request) {
	clientID := r.FormValue("clientID")
	if clientID == "" {
		http.Error(w, "No clientID defined", http.StatusUnprocessableEntity)
		return
	}

	// public room
	publicRoomRegex := "^observable-room$"
	// private room of the request user
	userPrivateRoomRegex := fmt.Sprintf("^private-room-%s$", clientID)
	// private rooms of every user besides the request user
	otherUsersPrivateRoomsRegex := fmt.Sprintf("^private-room-(?!%s$).+$", clientID)
	claims := customClaims{
		StandardClaims: jwt.StandardClaims{
			ExpiresAt: time.Now().Add(time.Minute * 3).Unix(),
		},
		Client:  clientID,
		Channel: scaledroneID,
		Data: userData{
			Name:  getRandomName(),
			Color: getRandomColor(),
		},
		Permissions: map[string]permissionClaims{
			publicRoomRegex: permissionClaims{ // public room
				Publish:   true, // allow publishing to public chatroom
				Subscribe: true, // allow subscribing to public chatroom
			},
			userPrivateRoomRegex: permissionClaims{
				Publish:   false, // no need to publish to ourselves
				Subscribe: true,  // allow subscribing to private messages
			},
			otherUsersPrivateRoomsRegex: permissionClaims{
				Publish:   true,  // allow publishing to other users
				Subscribe: false, // don't allow subscribing to messages sent to other users
			},
		},
	}

	// Create a new token
	token := jwt.NewWithClaims(jwt.SigningMethodHS256, claims)

	// Sign the token with our secret
	tokenString, err := token.SignedString([]byte(scaledroneSecret))
	if err != nil {
		http.Error(w, "Unable to sign the token", http.StatusUnprocessableEntity)
		return
	}
	// Send the token to the user
	w.Write([]byte(tokenString))
}
As you can see, each authenticating user is given individual access levels to three rooms defined by regular expressions. Each regexp defines one type of access level.
^observable-room$Targets the public room in which everyone will be able to publish messages and subscribe to them.To get access to the who's online features we're using Scaledrone's observable rooms feature. For this to work, the room name needs to be prefixed with
observable-.^private-room-clientid$Targets the private room of the user currently being authenticated. That user will be the only one that can subscribe to their own room (into which other users will be sending private messages).^private-room-(?!clientid$).+$Targets all private rooms besides the private room of the user currently being authenticated. This allows everyone to publish private messages to other users but not subscribe to them.
To keep the tutorial shorter, we're going to be assiging each user a random color and name using the JWT data claim. In your own app, pull this data from your database.
func getRandomName() string {
	adjs := []string{"autumn", "hidden", "bitter", "misty", "silent", "empty", "dry", "dark", "summer", "icy", "delicate", "quiet", "white", "cool", "spring", "winter", "patient", "twilight", "dawn", "crimson", "wispy", "weathered", "blue", "billowing", "broken", "cold", "damp", "falling", "frosty", "green", "long", "late", "lingering", "bold", "little", "morning", "muddy", "old", "red", "rough", "still", "small", "sparkling", "throbbing", "shy", "wandering", "withered", "wild", "black", "young", "holy", "solitary", "fragrant", "aged", "snowy", "proud", "floral", "restless", "divine", "polished", "ancient", "purple", "lively", "nameless"}
	nouns := []string{"waterfall", "river", "breeze", "moon", "rain", "wind", "sea", "morning", "snow", "lake", "sunset", "pine", "shadow", "leaf", "dawn", "glitter", "forest", "hill", "cloud", "meadow", "sun", "glade", "bird", "brook", "butterfly", "bush", "dew", "dust", "field", "fire", "flower", "firefly", "feather", "grass", "haze", "mountain", "night", "pond", "darkness", "snowflake", "silence", "sound", "sky", "shape", "surf", "thunder", "violet", "water", "wildflower", "wave", "water", "resonance", "sun", "wood", "dream", "cherry", "tree", "fog", "frost", "voice", "paper", "frog", "smoke", "star"}
	return adjs[rand.Intn(len(adjs))] + "_" + nouns[rand.Intn(len(nouns))]
}

func getRandomColor() string {
	return "#" + strconv.FormatInt(rand.Int63n(0xFFFFFF), 16)
}
Setting up the frontend
All of the frontend files live in the /static directory.
index.html
You can find the full index.html file from here. The file contains:
- Scaledrone JavaScript library script tag
- Reference to the
script.jsfile - HTML Markup
- CSS Styles
script.js
You can find the full script.js file from here.
Let's get started by connecting to Scaledrone and then authenticating ourselves by making a POST request to our Go authentication server at http://localhost:8080/auth. Once we receive the JSON Web Token, we pass it on to Scaledrone.
// 👇 PS! Replace this with your own channel ID 🚨
const CLIENT_ID = 'YOUR_SCALEDRONE_ID';

// public room
const PUBLIC_ROOM_NAME = 'observable-room';
// array of connected memebers
let members = [];
// the session user
let me;
// keeping track of which room the user has selected
let selectedRoom = PUBLIC_ROOM_NAME;
// room name to messages map, this is used to store messages for displaying them
// at a later state
const roomMessages = {};

const drone = new Scaledrone(CLIENT_ID);

drone.on('open', error => {
  if (error) {
    return console.error(error);
  }
  // get JWT from the Go server for the clientID
  const formData = new FormData();
  formData.append('clientID', drone.clientId);
  fetch('/auth', {body: formData, method: 'POST'})
    .then(res => res.text())
    .then(jwt => drone.authenticate(jwt));
});

drone.on('authenticate', error => {
  if (error) {
    return console.error(error);
  }
  console.log('Successfully connected to Scaledrone');
  joinPublicRoom();
  joinPersonalRoom();
});
Once we've successfully connected and authenticated ourselves, we'll subscribe to messages both from the public room as well as our own private room (for private messages sent to us).
As all users subscribe to the public room, we can use it for detecting who is connected to the app as well as get notified when new users join and leave.
This is the most complex section of this tutorial but don't be alarmed. It's actually quite repetitive, and I added comments that will help you understand what's going on.
// Start subscribing to messages from the public room
function joinPublicRoom() {
  const publicRoom = drone.subscribe(PUBLIC_ROOM_NAME);
  publicRoom.on('open', error => {
    if (error) {
      return console.error(error);
    }
    console.log(`Successfully joined room ${PUBLIC_ROOM_NAME}`);
  });

  // Received array of members currently connected to the public room
  publicRoom.on('members', m => {
    members = m;
    me = members.find(m => m.id === drone.clientId);
    DOM.updateMembers();
  });

  // New member joined the public room
  publicRoom.on('member_join', member => {
    members.push(member);
    DOM.updateMembers();
  });

  // Member left public room (closed browser tab)
  publicRoom.on('member_leave', ({id}) => {
    const index = members.findIndex(member => member.id === id);
    members.splice(index, 1);
    DOM.updateMembers();
  });

  // Received public message
  publicRoom.on('message', message => {
    const {data, member} = message;
    if (member && member !== me) {
      addMessageToRoomArray(PUBLIC_ROOM_NAME, member, data);
      if (selectedRoom === PUBLIC_ROOM_NAME) {
        DOM.addMessageToList(data, member);
      }
    }
  });
}

// Start subscribing to messages from my private room (PMs to me)
function joinPersonalRoom() {
  const roomName = createPrivateRoomName(drone.clientId);
  const myRoom = drone.subscribe(roomName);
  myRoom.on('open', error => {
    if (error) {
      return console.error(error);
    }
    console.log(`Successfully joined room ${roomName}`);
  });

  myRoom.on('message', message => {
    const {data, clientId} = message;
    const member = members.find(m => m.id === clientId);
    if (member) {
      addMessageToRoomArray(createPrivateRoomName(member.id), member, data);
      if (selectedRoom === createPrivateRoomName(clientId)) {
        DOM.addMessageToList(data, member);
      }
    } else {
      /* Message is sent from golang using the REST API.
       * You can handle it like a regular message but it won't have a connection
       * session attached to it (this means no member argument)
       */
    }
  });
}

drone.on('close', event => {
  console.log('Connection was closed', event);
});

drone.on('error', error => {
  console.error(error);
});

function changeRoom(name, roomName) {
  selectedRoom = roomName;
  DOM.updateChatTitle(name);
  DOM.clearMessages();
  if (roomMessages[roomName]) {
    roomMessages[roomName].forEach(({data, member}) =>
      DOM.addMessageToList(data, member)
    );
  }
}

function createPrivateRoomName(clientId) {
  return `private-room-${clientId}`;
}

function addMessageToRoomArray(roomName, member, data) {
  console.log('add', roomName, member.id, data);
  roomMessages[roomName] = roomMessages[roomName] || [];
  roomMessages[roomName].push({member, data});
}
Lastly, we'll be writing the code that directly manipulates the DOM and renders our application. We won't be using any fancy frameworks as the frontend can easily be built with under a hundred lines of native JavaScript:
const DOM = {
  elements: {
    me: document.querySelector('.me'),
    membersList: document.querySelector('.members-list'),
    messages: document.querySelector('.messages'),
    input: document.querySelector('.message-form__input'),
    form: document.querySelector('.message-form'),
    chatTitle: document.querySelector('.chat-title'),
    room: document.querySelector('.room'),
  },

  // Send message to Scaledrone and clear the input
  sendMessage() {
    const {input} = this.elements;
    const value = input.value;
    if (value === '') {
      return;
    }
    input.value = '';
    drone.publish({
      room: selectedRoom,
      message: value,
    });
    addMessageToRoomArray(selectedRoom, me, value);
    this.addMessageToList(value, me);
  },

  // Create DOM element with member name and color
  createMemberElement(member) {
    const { name, color } = member.authData;
    const el = document.createElement('div');
    el.appendChild(document.createTextNode(name));
    el.className = 'member';
    el.style.color = color;
    if (member !== me) {
      // Listen to user clicking on another user
      el.addEventListener('click', () =>
        changeRoom(member.authData.name, createPrivateRoomName(member.id))
      );
    }
    return el;
  },

  // Rerender the list of connected members
  updateMembers() {
    this.elements.me.innerHTML = '';
    this.elements.me.appendChild(this.createMemberElement(me));
    this.elements.membersList.innerHTML = '';
    members.filter(m => m !== me).forEach(member =>
      this.elements.membersList.appendChild(this.createMemberElement(member))
    );
  },

  // Create a DOM element for the message
  createMessageElement(text, member) {
    const el = document.createElement('div');
    el.appendChild(this.createMemberElement(member));
    el.appendChild(document.createTextNode(text));
    el.className = 'message';
    return el;
  },

  // Add message element to the messages container
  addMessageToList(text, member) {
    const el = this.elements.messages;
    const wasTop = el.scrollTop === el.scrollHeight - el.clientHeight;
    el.appendChild(this.createMessageElement(text, member));
    if (wasTop) {
      el.scrollTop = el.scrollHeight - el.clientHeight;
    }
  },

  updateChatTitle(roomName) {
    this.elements.chatTitle.innerText = roomName;
  },

  clearMessages() {
    this.elements.messages.innerHTML = '';
  },
};
// Listen to submitting the input form
DOM.elements.form.addEventListener('submit', () =>
  DOM.sendMessage()
);
// Listen to user clicking on the public room label
DOM.elements.room.addEventListener('click', () =>
  changeRoom('Public room', PUBLIC_ROOM_NAME)
);
Bravo! You are done. 🐹✈️
If anything was left unclear from this tutorial, I recommend grabbing the full source code from GitHub, replacing the channel ID and channel secret and running the project.
And as always, if you have any questions or feedback feel free to contact us.
